
 There are a ton of administrative details related to your ministry. These feel like tedious, repetitive tasks that have to be done each day, week and month. On top of the important tasks, urgent ones keep screaming for your attention. It can make you feel overwhelmed and stressed.
- A new member report type > Remove People from Group.
- A new report filter > Members > Custom Attributes > All dates can select Month and Day (without year).
As you start working with these, you'll find many more uses. But, these are the two most common, repetitive administrative details that people have shared with us that led to these report upgrades. The best part is that once you build the reports you can save and then schedule them. From then on, you will simply be notified when they have run.

Automate Promotion. Unlike older children, preschoolers often promote from one class to another based on their birthday not the school year. The easiest way to manually do this detailed task is by listing Birth Date as one of the columns in the group view for those classes. If you sort by birthday, you can select the ones who should be promoted manually and transfer them to the next class. But, why not automate this process and completely get it off your task list? You can do this by creating, saving, and scheduling two reports:
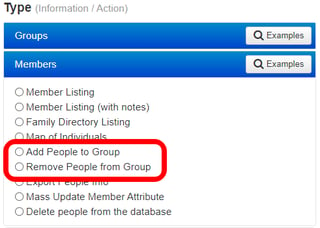
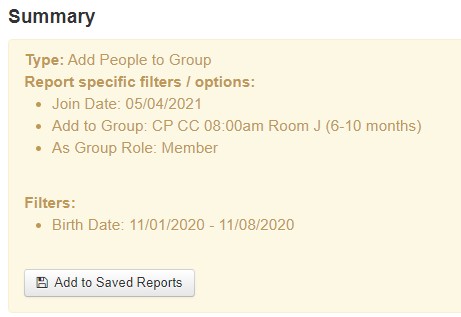
- Add People to Group.
- Go to Reports > Members > Add People to Group. Select the group you want to promote people to.
- Then Filters > Members > Custom Member Attributes and scroll down to choose the Birth Date range of children that need to be added.
- Save this report with a dynamic date range using X to Y weeks to pick up the right people each week. Example: 26 to 27 weeks ago would be children that turned 6 months old last week.
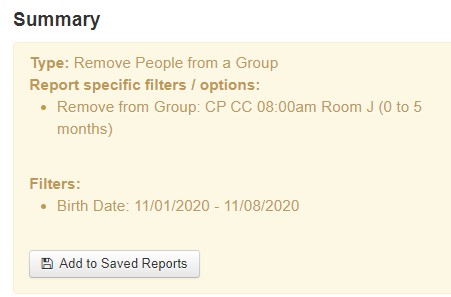
- Remove from Group.
- Go to Reports > Member > Remove People from Group. Select the group the promoted child in #1 needs to be removed from.
- Use the same Filters as before.
- Save the same way as before with the same dynamic date range.
- Schedule the Reports.
- Go to Reports > Scheduled Reports.
- Click the blue button to choose and schedule the day of the week and time you want the reports to run.
Automate Birthdays. Recognizing children and adults on their birthdays is a wonderful way to care for your people. Everyone likes to be recognized on their big day whether by text, email or a personal note. Last week we added a filter option for dates that allows you filter just by month or by month and day.
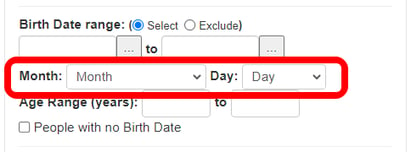 Filter by other factors like church member type, household role, or group involvement first. Then, go to Birth Date. If you wanted to run a report for everyone with a birthday in June, you would use just the the Month drop down. If you want to run a report for everyone on a specific day, you would use both drop downs, i. e. June and 7.
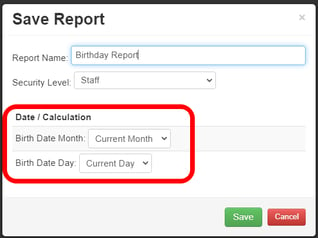
When you save the report, you will have the option to save it for the current month or the current month and the current day.
These are the tools. Here is the best way to use them to recognize birthdays in three ways.
- Hand-written note.
- Use either Reports > Members > Listing or Reports > Members > Export People info.
- Choose the info you want to see (or mail merge) - name, address, birthdate.
- Use the filters above.
- Save the report. A member listing is generally sufficient if an admin is hand-writing envelopes.
- Personalized email.
- Go to Communicate > Email > Templates to create your custom birthday email using
 to personalize by first name. Use images, gifs or any of the other options to make the email special.
 - Save as a template.
- Create a simple workflow that only sends this one email. You do NOT need to associate a group with the workflow.
- Go to Reports > Communication > Add People to Workflow, select the Birthday workflow you just created.
- Use the filters above.
- Save the report.
- Go to Communicate > Email > Templates to create your custom birthday email using
- Personalized text.
- Go to Communicate > Text > Templates to create your custom birthday text using to personalize. Remember to keep the text under 159 characters for best delivery.
- Save as a template.
- Create a simple workflow that only sends this one text.
- Go to Reports > Communication > Add People To Workflow, select the Birthday workflow you just created.
- Use the filters above.
- Save the report.
Freedom. Now that you've Saved the report of your choice, it's time to completely set yourself free. Go to Reports > Scheduled Reports and click to schedule the report. You can automate emails and texts to go out daily. Schedule a list or an export to be emailed to you weekly or monthly for handwritten notes.


