 Eight weeks ago, I did a blog post on using Workflows to help you with volunteer recruitment. This is the time of the year that most church staff are stressed out to make sure all the volunteers needed are in place. But, once you get them recruited and trained, there is still the challenge of getting everyone scheduled.
That's the next summit, here's how to climb it.
Create your teams (groups). There are two schools of thought on how to create serving teams. One is to put everyone serving in an area on a single team and pick and choose people and dates. You can certainly do this in the software, but we recommend that you create multiple groups / teams generally based on frequency of service. For instance instead of one team of greeters that serve twice a month, create two teams. One serves 1st and 3rd weeks, the other 2nd and 4th. This will simplify some of the next steps.

Assign people to dates. Once the team is built not only can you use it to communicate and track attendance, but you can also use it to schedule when team members serve. Just click the Volunteer button to select the dates / times and the people you want to serve those dates.

Assign roles. When you make the assignments there is also an option to set specific roles for each person to play. Another option allows you to let people choose the role they want. This option even lets the leader define how many people are needed for each role and tracks responses counting down the number needed. Once that number is met, volunteers no longer can choose that role.

Discover scheduling conflicts. Some systems ask or even require volunteers to pre-select the dates they will not be able to serve. This is the block-out dates approach. Churchteams uses more of an RSVP approach. When you select people, assign dates and roles; you are prompted to write and send an email. This is sent as both an email and text that includes a link that takes them to their page in the database to Accept or Decline the opportunity to serve. Rather than blocking out a date, they decline the opportunity to serve.

Substitutes. When someone accepts or declines an opportunity to serve, the system automatically notifies the leader. This email includes a link that takes the leader back into the software to review response rates and communicate as needed. From this page she can invite a substitute to cover for anyone who declines. Use group roles within the group itself to identify substitutes. Substitutes on one team (ex. 2nd and 4th week) may be members of another team (ex. 1st and 3rd week). Note: our development plan does include an option for volunteers to get their own substitutes.

Reminders. When making assignments you do not have to send out the RSVP. If you choose to this option, the system will send reminders to all the volunteers of the day/time and role they are to serve. Otherwise the reminders are only sent to the volunteers who accepted the opportunity to serve. By default the reminders are sent out 6 days and 1 day before the serve, but these can be customized. You can also customize the reminder message that goes out by email. Text reminders can not be customized. Both are automatically sent.

Adding attachments. When send invitation or email later or both. Curriculum, worship flow, chord charts, etc. If volunteers need to be given curriculum, service plans, chord charts, videos, soundtracks, etc.; these can be either linked or attached to the RSVP email so they can preview it even before they respond. They can also be attached to emails sent to the team.

Volunteer schedule report. Your team is now scheduled, they have the resources they need, they know when and where they are supposed to be. All that's left is to print out a summary sheet for quick, easy reference on Sunday. Go to Reports / Groups and choose Volunteer Schedule. Then filter by Groups / People In A Group and choose either the groups (teams) individually or by the related ministry area. Run and print the report.
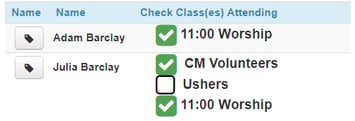
 Taking attendance. By default, the system will automatically take attendance for everyone whose RSVP response is set as Accept 2 hours after the start time. You can also use the check-in system to take volunteer attendance. Parents who are volunteers can check not only their kids into their classes, but they can check themselves as present for their serving team. Check-in allows printing of name tags for volunteers if desired. Even if a volunteer's attendance is taken twice, the system will recognize them as attending just once per day per team.
The system is flexible to accommodate many different volunteer team-building and scheduling approaches. There are things that are unique in our design of this system, so if you need help as you are working with it, please let us know. Our support team would love to be your volunteer climbing guide.


