Just like human relationships get messy over time, church management software databases get messy over time. Sometimes when things get messy it leads to a break up. More often it becomes unresolved tolerance. If you're reading this, you are probably somewhere on the spectrum between breaking up with and tolerating your database and are looking for a better option.
The Bible clearly teaches us that human relationships can be restored by aligning with God's design. Similarly, database relationships can be restored by aligning with software design. You don't have to break up with nor simply tolerate your church database. Let me walk you through a process to get your people and groups cleaned up and re-aligned in Churchteams. Doing them in this exact order matches the design of software.
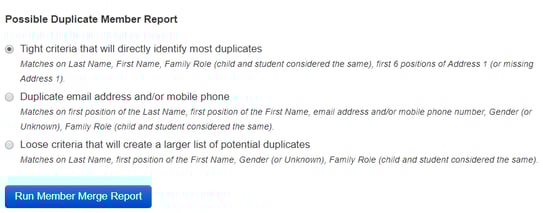
1. Merge members (people). Under the People button click Merge then run each of the 3 Possible Duplicate Member Reports starting at the top. You'll see that each one gives you the criteria the report is using to locate duplicates. It is a good idea to have an admin or pastor with social knowledge of the church present to evaluate these. Not every suggestion is an actual duplicate.
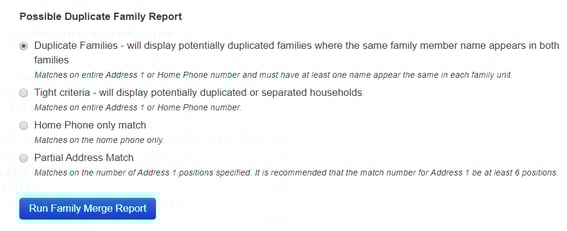
 2. Merge families.
 On the same page in the right column use the same process to run the Possible Duplicate Family Reports. Start at the top and work your way down.
 3. Merge groups.
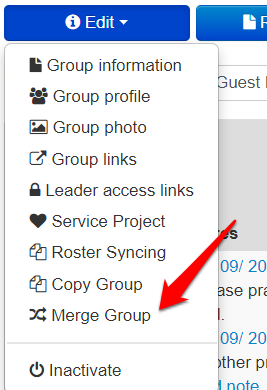
A common but not best practice is to create a new group or event every time something like a New Members class or Vacation Bible School happens. The result is an excessive number of groups that need to be merged into a single group. If you want to track attendance go into each group / event and make a meeting report for the day of the event and mark everyone in the group present. Then remove them from the group. The system keeps their membership history. Do this for each event. Finally, use the option within each group under the Blue Edit button to merge them all into a single group. Merging them will merge attendance giving you a more clear history and keep everyone in the membership history. It will also clean up your groups listing.
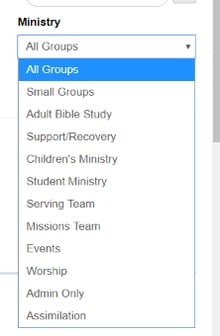
4. Clean up the Group (Ministry Type) Profile. You can see this profile on the Browse Groups page, but you edit it under Settings / Groups / Profile Questions. There should not be more than 10 or 12 options there - less is better. These responses need to be a broad as possible. Often we see a Group/Ministry Type that includes just one group, ex. Celebrate Recovery. A more broad category would be Support/Recovery or Care Ministry. Often it is helpful to map these ministry categories on a piece of paper or white board. This process helps you sharpen your organizational structure. Here are the defaults we provide for new accounts. My suggestion for editing these on the Group Profile page is to put an x in front of the responses you plan to delete. Don't delete them until after you do the next step.
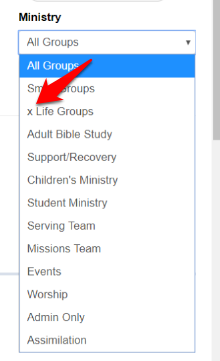
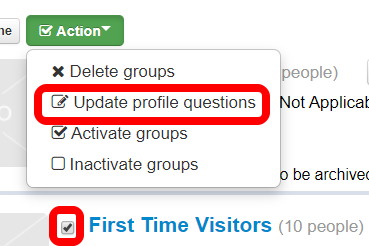
5. Realign groups to the cleaned up profile. Go to the Browse Groups page and use the filters to see all the groups currently listed under a Ministry Type marked (x) for deletion. Go through the list of groups and select the ones that are going to be moved to a different Ministry Type by checking the box by the name of the group. This will turn the Action button green. When you've selected all the groups to be moved to a different Profile Response, click the Action button and then "Update Profile Questions". This will take you to the page to mass update the profile questions for the groups selected. When the groups in the Ministry type to be removed are all moved, go back under Settings and delete that Ministry Type. Once done, I would go back through each Ministry Type to see if there are any groups that really need to be in another Ministry Type. You can use the Action button to help with that as well. This will clean up the Ministry Type filters so that you can effectively use them as filters for reports.
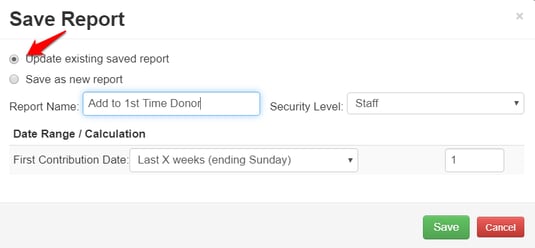
6. Clean Up Saved Reports. Once all your ministry types are rightly aligned, you'll be able to create and Save reports using Ministry Types as filters. You may want to remove some of the current saved reports (choose the report then click the red x). To re-organize them using a naming convention, select the report then click Add To Saved Reports where you can edit the name.
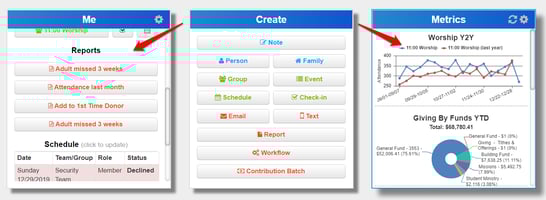
 Assuming you have switched to our individual passwords access level, each staff person can add the Saved Reports they most frequently use to their Me Card on the dashboard. Chart reports that are Saved are available for quick view in the Metrics card.
These 6 steps, done in this order, will help you clean up or refresh your Church Software database. There are other, even more granular adjustments like Note Types and Church Member Types that you will find in the Settings drop down. It is definitely worth your time to review those as well.