
 "How do I set up check-in for our church?" The answer to that question continues to evolve as we continue to adopt newer and better technology. I'm going to skip the history lesson and jump right into the decisions you need to make now about check-in and then give you a general process for implementing them.
Assumptions. Here are a couple of expectations to make sure we're on the same page.
- You want to print security labels for your children. We recommend all your children from birth to 5th or 6th. If parents pick them up, they need a matching number.
- You want to check in the whole family at once. If you have different areas for preschoolers and older kids, it is still easier and more streamlined for families to pick up their labels all at once at either place.
DECIDE
Numbers. First, make sure you know your attendance history.
- How many children do you plan to check-in in a week? This helps you plan for supplies.
- How many children do you check-in for your largest session or Sunday School hour? We recommend at least two label printers no matter what with one committed to guests, but also one label printer for each 25 to 40 kids that check-in.
Space. Now you have an idea about how many label printers you need. Next, think about your space and where you want parents to pick up their name tags. People are standing up, so make sure the table or shelf is the right height.
Method. Next you need to determine how you want people to check-in.
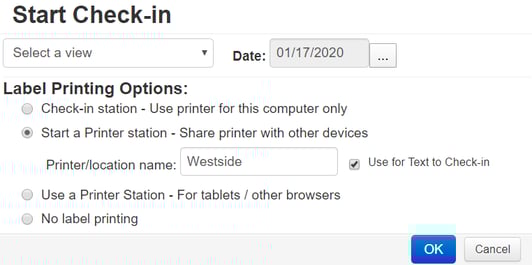
- Station. A check-in center, kiosk, stand up table or shelf is really common. These typically are one computer with a label printer attached. By choosing to Start a Printer station (see image), you can set the computer up as the connector from other screens to the label printer. You can even use another browser on the same computer as one of your screens.
- Tablet. It doesn't matter if you mount iPads or other tablets near the label printer or make them mobile, login to do check-in and choose the "Use a Printer Station" option to make the tablet a screen that connects to the computer attached to the label printer.
- Text. When you start a Printer station, check the option to "Use for Text to Check-in". This allows families to text the word "Check" to your Text to Church phone number. They get a link back that takes them to a screen to check their family in.
- Combination. You can use a combination of any or all of these methods depending on your situation and needs.
IMPLEMENT
For more details on specific questions related to implementation and use of Churchteams Check-in, check out our Knowledge Base Articles and/or sign up for the Check-in webinar. In general, here are the five steps to implement Check-in.
- Create your groups. Like every other ministry, create the groups you want to check-in. Children's classes. Worship services. Youth classes & serving teams. Adult classes & serving teams.
- Get your equipment. Retask current computers and label printers. Or buy new ones. We currently recommend any Windows 10 based PC, Brother QL 820W wireless (even battery if you want) or Dymo Turbo 450 for USB label printers, and any tablet. This will be updated under Check-in / Label Printer Info/Recommendations in the App. Buy labels for your label printers. "Quality labels for less" link under check-in tab can help.
- Set up your label printers. Follow the instructions listed on the Lable Printer Info/Recommendations page. We recommend using Chrome.
- Customize your Views/Setup. Under the Check-in tab. Use these to customize your security labels/name tags and both your login and family screens. Also choose the classes, teams and worship services that people will be able to check in to using that View.
- Bookmark login link. Make it easy to start check-in by putting an icon on the desktop of your check-in computer and any tablets.
Once you have everything set up, be sure to test it with a quick practice run. Revisit the setup instructions and/or the Knowledge Base articles for troubleshooting.


